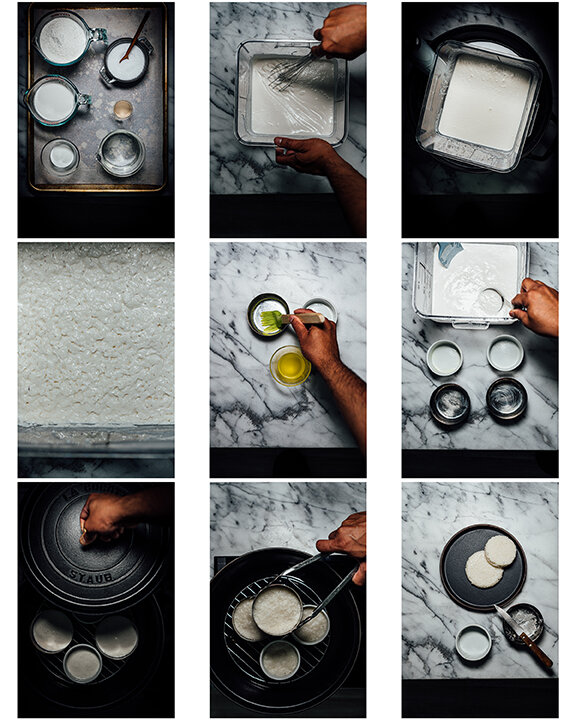
The method I share today takes a few shortcuts to reduce the time needed to soak rice and ferment it. Principle: The main principle here is fermentation, similar to dosa and yogurt. Here, rice and coconut milk provide the source of carbohydrates, proteins, and fats, among other nutrients that act as a food source for yeast. Sugar helps to boost the yeast energy and leaves a sweet taste in the cooked bread. Once the fermented rice is steamed and cooked, the starch in the rice will begin to gelatinize/thicken at about 140F/60C and form bonds across the batter while the carbon dioxide bubbles get trapped to reveal a light and airy sponge-like network. Rice Flour: Any short-grain rice or rice flour will work. I’ve tried basmati and found no difference in taste or texture. If you don’t have any on hand, grind dry rice grains to make the flour using a high-speed blender like a Vitamix (use the same weight listed in the recipe). Pay attention to the amount of water you use; this batter is slightly runnier than the one I used in dosa. Sugar: Here, sugar not only helps to provide sucrose, a simple disaccharide for the yeast to utilize as an energy source, but it also leaves a mild sweet taste in the bread. Yeast: In Goa, these breads are made with toddy, the liquid prepared from the sap of the coconut tree. Once the sap is collected, it is left to ferment on its own, and an alcohol liquid is produced that contains wild yeast. Toddy also leaves a distinguishable taste in fermented foods that’s difficult to replicate. Toddy is hard to find outside India (and even difficult to find outside Goa unless you have a source); keeping that in mind, I’ve worked out this recipe using active dry yeast. The optimal growth temperature is 86F/30C; at this temperature, yeast (Saccharomyces cerevisae) will show a maximal exponential growth rate. As I wrote in the dosa post, my apartment stays cool, so I use my sous vide (I own a Joule), set a water bath to 86F/30C, and then stick the container with the batter in and leave it to ferment for at least 5 hours. If your apartment is warm, you can skip this. Can I use an Instant pot? – this is a popular question for almost any recipe these days. I would not recommend using the yogurt setting on the Instant pot when yeast is involved; that temperature setting is a bit high (110F/43C) for yeast to grow well and is geared towards lactobacilli growth which prefers warmer conditions. Water: I live in an area with hard water, so I use filtered water when I work with yeast. You can use hard water, but it will slow down yeast growth, and your fermentation time might increase. Coconut Milk: I use full-fat coconut milk. Fat gives a nice mouthfeel, prevents dryness, and makes it easier to get steamed bread out of the bowl after cooking. Try to use a brand that’s free from preservatives. A general rule of thumb when using canned or packaged coconut milk is to check to see if they contain preservatives; they might interfere with the ability of the yeast to grow. Greasing the molds: Ghee, unsalted butter, coconut oil, or a neutral oil like grapeseed will work great here. As you might expect, the first three fats, I listed will leave a bit of a taste, while grapeseed won’t. There’s also a slight difference in the texture on the surface of the sanna that comes into contact with the greased surface of the bowl with different fats. Fermentation time: This does make a difference. If fermented too long, the amount of acid increases while the amount of sweetness decreases. If the time of fermentation is overestimated, taste the batter (it is safe); if it’s too sour, stir in a little more sugar to give it a little sweetness, about 1 to 2 tsp. Technique Whisk: Whisk well. Scrape the sides of the bowl down to ensure that all the rice flour is wet and dispersed in the liquid phase. Tools:
You can use an idli maker if you own one. I’m using ceramic ramekin bowls, and stainless-steel bowls called katoras (Hindi). Stainless steel is a good conductor of heat and allows for faster cooking, while ceramic, being much weaker at heat conductivity, will take a bit more time to cook. You will need a wire rack or steamer that fits inside a large pot. This prevents direct contact of the bowl with the base of the pot and prevents overcooking.
How much batter to pour? I’m not going to give you an actual number of sannas because bowl sizes vary by diameter. I usually pour enough batter to reach a height of about 1 in/2.5 cm or a bit less than that. If the batter level is too high, the cooking time increases, and sometimes they’re not cooked properly through the center. You can tell the doneness of the sanna, by gently pressing the center; it should be firm yet spring back. 2 Tbsp sugar 1 tsp active dry yeast 1 1/2 cups/360 ml water (I used filtered) 1 cup/240 ml full-fat coconut milk fine sea salt a little melted butter, ghee, coconut oil, or neutral-tasting oil to grease the bowls